Proper Rowing Machine Form: How to Row Properly
Good rowing technique makes every workout faster, safer and easier on your back. This guide breaks the stroke into its four phases, shows the correct sequence, and lists the most common rowing machine form mistakes with simple fixes.
Proper rowing form has four phases: catch, drive, finish and recovery. Drive with legs, then body, then arms; recover with arms, then body, then legs. Keep the recovery about twice as long as the drive, the damper around 3 to 5, and let most of the power come from the legs.
Best for: Anyone learning how to use a rowing machine, or fixing a stroke that feels awkward, slow or hard on the back.
- ✓Diagrams of all four stroke phases
- ✓8 common mistakes with fixes and drills
- ✓A one-minute form checklist
The four phases of the rowing stroke
1. The catch
The start of the stroke, compressed at the front of the slide and ready to push.
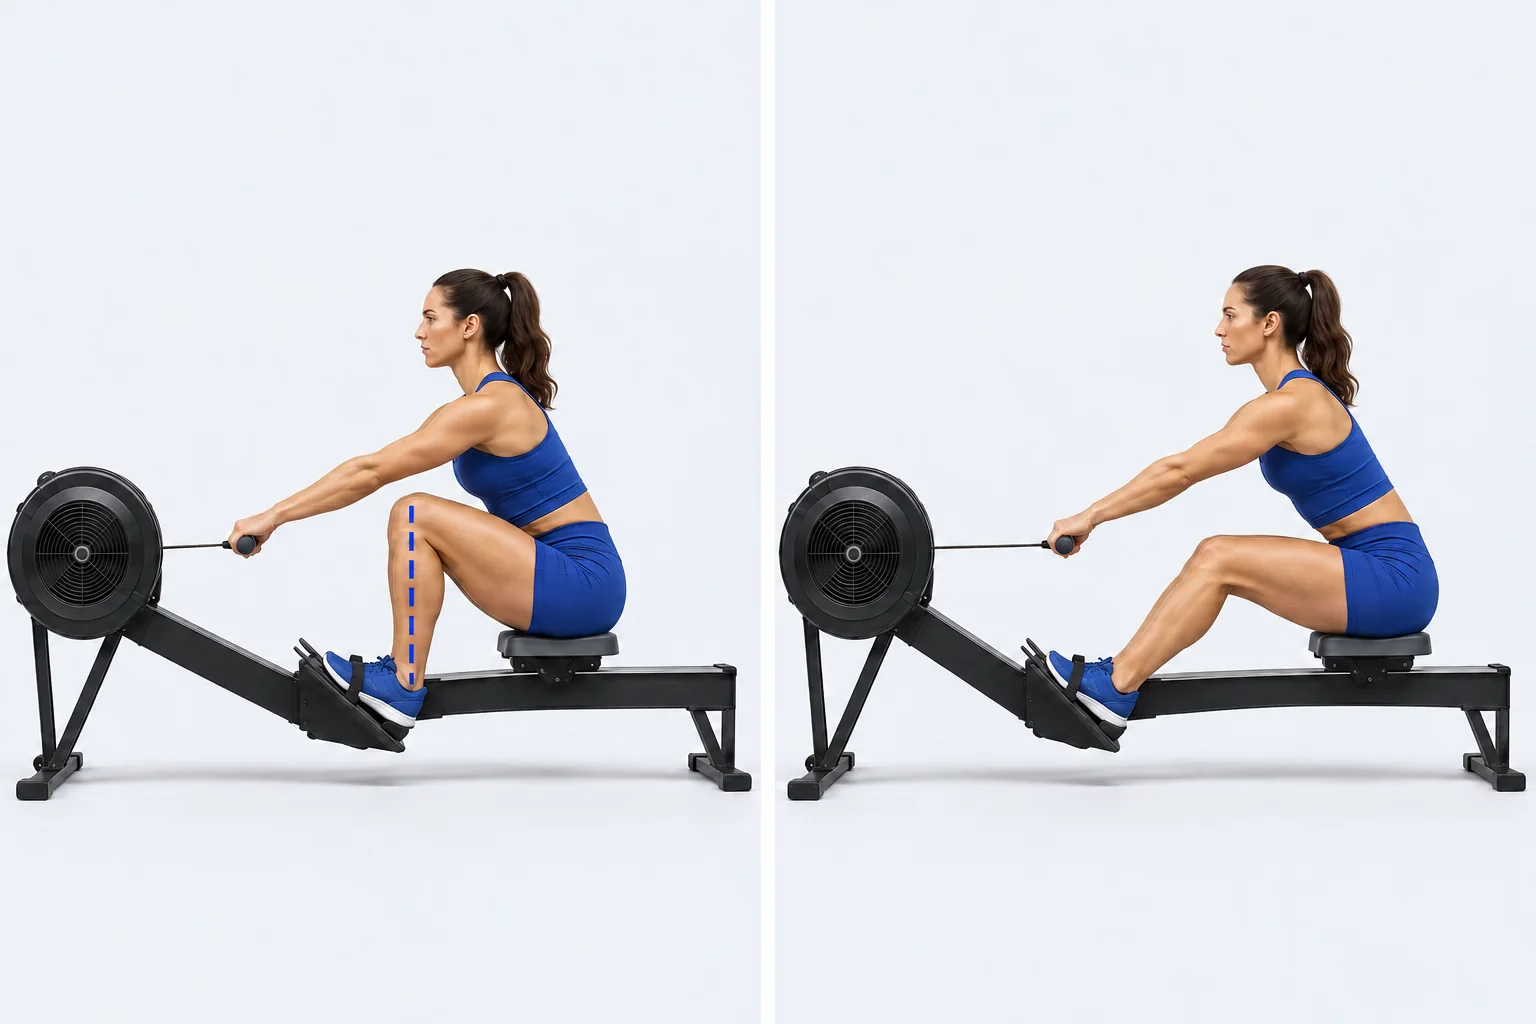
- Shins vertical, or as close to vertical as your flexibility allows. Do not let them pass vertical.
- Body leaning forward from the hips (about 1 o’clock), shoulders in front of the hips.
- Arms straight, shoulders relaxed and level, grip loose with flat wrists.
- Head neutral, eyes forward. Heels may lift a little.
2. The drive
The power phase. Legs, then body, then arms, with the handle and seat connected.
- Push with the legs first. The body angle stays forward and the arms stay straight.
- The handle and seat move together; if the seat moves first, you have lost connection.
- As the legs flatten, swing the body back from the hips to just past vertical.
- Only then draw the arms in, elbows passing the body.
3. The finish
The end of the drive, a strong supported position before the recovery begins.
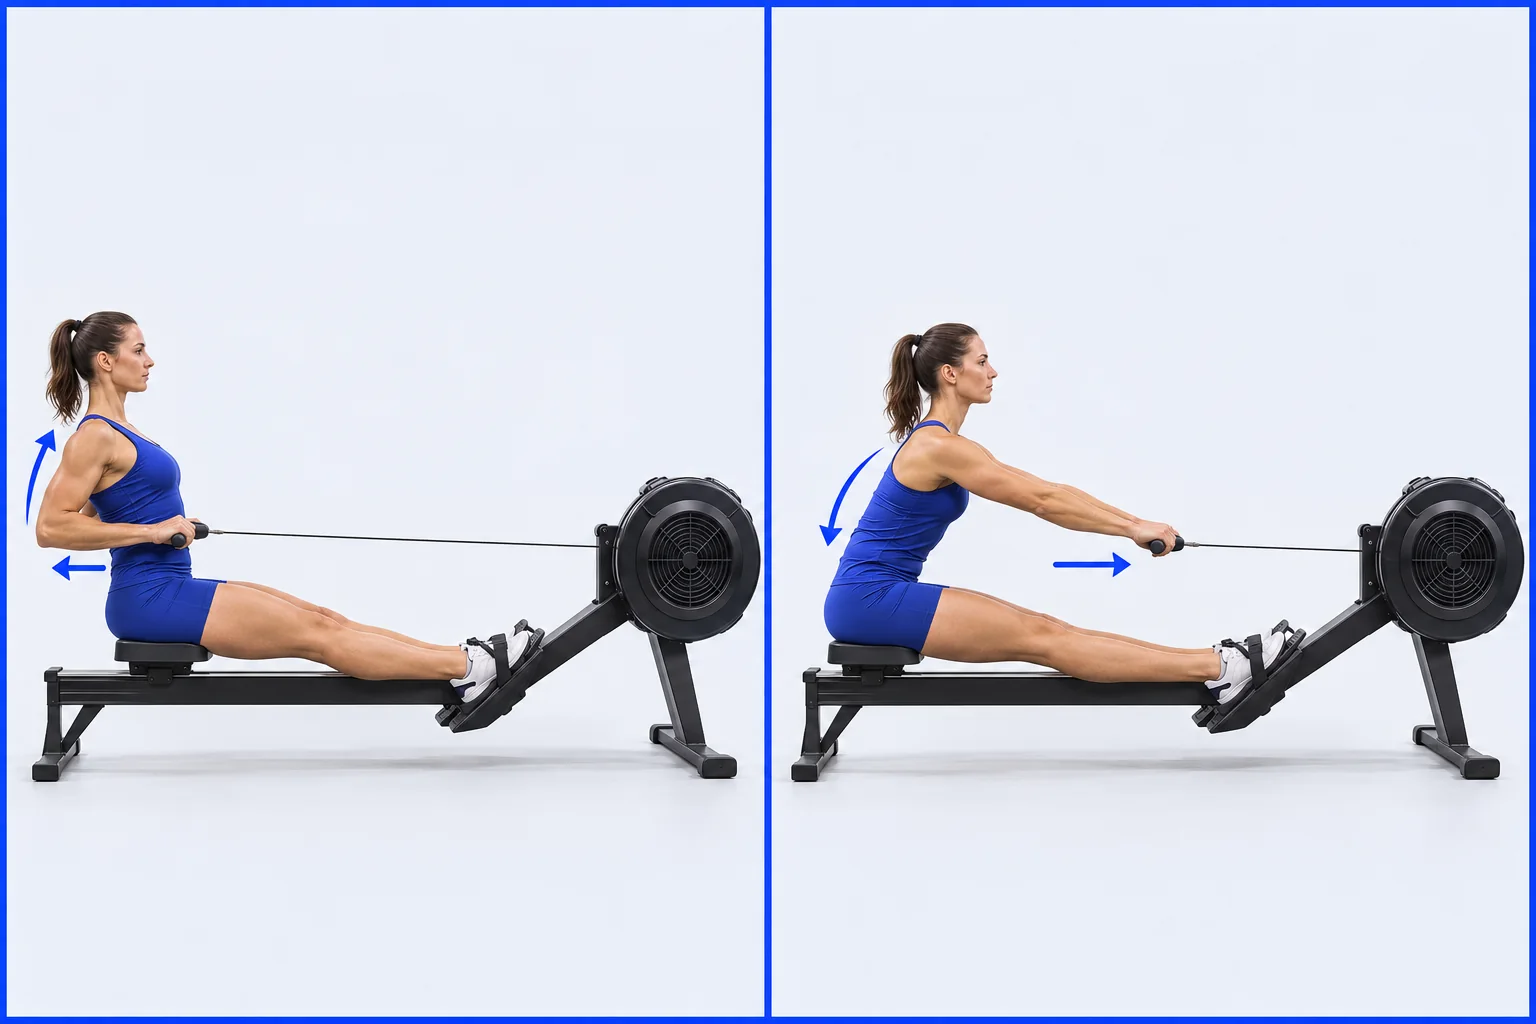
- Legs extended, knees soft rather than locked.
- Body leaning slightly back (about 11 o’clock), supported by the core.
- Handle at the lower ribs, forearms roughly level, wrists flat.
- Shoulders down and relaxed, elbows past the body, not flared wide.
4. The recovery
The return to the catch: arms, body, legs. Slower than the drive.
- Extend the arms toward the flywheel first.
- Then hinge the body forward from the hips to the catch angle.
- Once the hands are past the knees, let the knees bend and the seat slide forward.
- Take your time: the recovery should last about twice as long as the drive at steady rates.
Sequencing: legs, body, arms
Drive
- 1. Legs push
- 2. Body swings back
- 3. Arms draw in
Recovery
- 1. Arms extend
- 2. Body pivots forward
- 3. Legs bend, seat slides
The movements overlap smoothly rather than happening as three separate steps, but the order never changes. Most of the power comes from the legs; the body and arms carry that power through to the handle. If you remember one thing about correct rowing form, make it this order.
Ratio and stroke rate
Ratio is the time on the drive compared with the time on the recovery. At steady rates aim for roughly 1:2: a quick, powerful drive and a recovery twice as long.
- 18 to 22 spm: steady state and technique work. Ratio about 1:2 or longer.
- 24 to 28 spm: threshold and harder aerobic pieces. Ratio around 1:1.5 to 1:2.
- 28 to 36 spm: 2K racing and sprints. The recovery shortens but should never be faster than the drive.
Put it into practice with structured sessions from the rowing machine workouts library, or check how far you travel per stroke with the stroke efficiency calculator.
Damper setting and drag factor
The damper lever controls how much air reaches the flywheel. A higher setting does not mean a better workout; it makes each stroke heavier and slower, more like a heavy, slow boat. Concept2 recommends about 3 to 5 for most rowers. Because airflow differs between machines, compare drag factor (shown on the PM5) rather than the lever number. Find a good starting point with the drag factor guide and calculator.
8 common rowing form mistakes and how to fix them
1. Shooting the slide
The seat moves back at the start of the drive but the handle barely moves, often with the hips sliding out from under the shoulders.
Fix: Feel the legs push the handle, not just the seat. Brace the core and keep the arms long as you press. Drill: rowing with the feet out of the straps forces connection.
2. Pulling with the arms too early
The elbows bend at the catch or early in the drive, so the small arm muscles do the work the legs should do.
Fix: Think of the arms as ropes until the legs are nearly flat. Drill: legs-only rowing with straight arms, then add the body swing.
3. Opening the back too early
The body swings back before the legs have done their work, putting load on the lower back and losing power.
Fix: Hold the forward body angle through the first half of the drive. Drill: half-slide rowing with the body angle locked.
4. Rushing the recovery
The seat races forward as fast as the drive. Rhythm breaks, the catch gets crunched and you tire faster.
Fix: Count "one" on the drive and "two, three" on the recovery. Drill: pause at arms-away and body-over for a few strokes.
5. Knees up before the hands clear
The knees bend at the finish before the arms extend, so the handle has to lift over the knees.
Fix: Recover in order: arms, body, then legs. Drill: the reverse pick drill (arms only, arms and body, half slide, full slide).
6. Over-reaching or over-compressing at the catch
Lunging the chest onto the thighs or sliding so far that the shins pass vertical, which puts the body in a weak position.
Fix: Stop the slide when the shins are vertical and get length from the hip hinge, not by collapsing forward.
7. Rounded back and hunched shoulders
Leaning forward by curling the spine instead of pivoting from the hips, often with shoulders creeping up toward the ears.
Fix: Sit tall on the seat bones, hinge from the hips, keep shoulders low. Drill: arms-and-body-only strokes at the finish end of the slide.
8. Too much layback or the wrong handle height
Leaning far back at the finish, pulling the handle to the chin or belly button, or flaring the elbows wide.
Fix: Finish at about 11 o’clock, draw the handle to the lower ribs on a level path, elbows past the body.
Proper rowing form checklist
- Feet strapped so the strap crosses the widest part of the foot.
- Damper around 3 to 5 for most workouts.
- At the catch: shins near vertical, arms straight, body forward from the hips.
- Drive order: legs, then body, then arms.
- Seat and handle move together at the start of the drive.
- At the finish: legs flat, slight layback, handle to the lower ribs, wrists flat.
- Recovery order: arms, then body, then legs.
- Hands pass the knees before the knees bend.
- Recovery slower than the drive (about 1:2 at steady rates).
- Relaxed grip, shoulders down, breathing steady.
Film your stroke and get AI feedback
It is hard to feel your own technique errors. The quickest way to check your rowing machine form is to film a 15 second side view at seat height, about 2 to 3 meters from the erg, with the whole body in frame.
ErgManiac technique analysis scores your catch, drive, finish and recovery from that video, flags sequencing errors and suggests drills to fix your top priorities. It is a Pro feature and is included in the 30-day free trial. Read how AI technique analysis works for details, or go deeper on angles and drills in the Concept2 technique guide.
Frequently asked questions
Proper rowing form follows four phases. At the catch, sit compressed with shins near vertical, arms straight and the body leaning forward from the hips. On the drive, push with the legs, then swing the body back, then pull the arms. At the finish, legs are flat, the body leans slightly back and the handle is at the lower ribs. On the recovery, reverse the order: arms, body, then legs, more slowly than the drive.
Film your stroke and get AI feedback
Upload a short side-view video and get per-phase scores, corrections and drills for your rowing form. Included in the Pro trial.
See technique analysis